
Request Access to Ad Astra Schedule
To request access to the Ad Astra scheduling system, please complete the workflow form below.
Note: This form is not for Guest Role (view-only) access. Guest access requires only a HawkID and password - no additional request is needed.
Ad Astra User's Guide
This guide is designed to provide an introduction to the end user covering basic navigation and features of Astra Schedule 8. Astra Schedule is the software utilized by the Office of the Registrar, Classroom Scheduling, for assignment of University Classrooms (UCR) intended for the schedule of courses and event management. The Classroom Scheduling office uses Astra Schedule to manage the UCR room file, optimize classroom bulk assignments, modify section room and building assignments, and schedule special events across our campus.
Overview
Astra Schedule's web-based format offers new capabilities for easier access to and dissemination of classroom scheduling information. Astra’s calendar tools provide multiple ways to view information about activities, classrooms and resources across the University Classroom pool quickly and easily. Anyone visiting the designated URL will find information made available to the public through a guest portal displaying scheduling views for both the schedule of courses and special event reservations. A HawkID and current password is required for the guest portal and the system end users. While the Office of the Registrar is responsible for administering Astra Schedule, the use of the software has been expanded into collegiate divisions providing increased scheduling information to our campus. Astra Schedule is available for use on-campus or off-campus through a VPN secure connection.
This campus tool is a reference application for classroom availability. Campus departmental conference rooms or classrooms that are not scheduled for instructional use will not appear in the Astra Schedule Classroom Viewer. Please help us provide accurate and efficient schedules by obtaining prior approval through Classroom Scheduling before use of UCR classrooms. This process is imperative to prevent double bookings of classrooms or delays in scheduled activities.
Classroom Scheduling and collegiate divisions reserve the right to approve or deny requests based on departmental or university operational policies. Classroom Scheduling’s priority is to provide classroom space to academic schedule of courses and supplemental academic events while maximizing space utilization for the campus. Generally speaking, schedule of courses will take precedence over special events and meetings which cannot displace a section.
Please be sure to verify active course session status upon viewing classroom schedules. Astra Schedule interfaces on a “real time” basis with our student information system, MAUI. Therefore, changes made in either system for an active course session will be reflected in the other system within a few short minutes. Only active course sessions displayed on MyUI should be considered official for classroom viewer display. Please note, final examination classroom assignments are not housed in Astra Schedule at this time.
If your system is idle for approximately 60 minutes, you will be logged out automatically. You will be prompted to log in again.
Quick Start Instructions for Astra Schedule Guest Viewer
Launch Ad Astra website. Please note: HawkID and Password are required to view classroom grids.
- Click on Calendars link located in upper left hand corner of the screen.
- Click on Scheduling Grids link.
- Choose Calendar pull down to view:
- College of Dentistry Guest
- College of Law
- College of Nursing
- College of Public Health Guest
- Dance
- DWLLC
- E240 CB Level 1 Classroom
- Field House
- Level 1 University Classrooms
- Physics and Astronomy
- School of Music Guest
- Speech and Hearing Center
- Theatre Arts
- University Classrooms
- Click on Filter pull down to view selected calendar filtering options.
- Click on Day or Week Tab in upper left hand corner of the screen for preferred view. (If Week is selected, be sure to click the desired classroom from the list to display classroom schedule.)
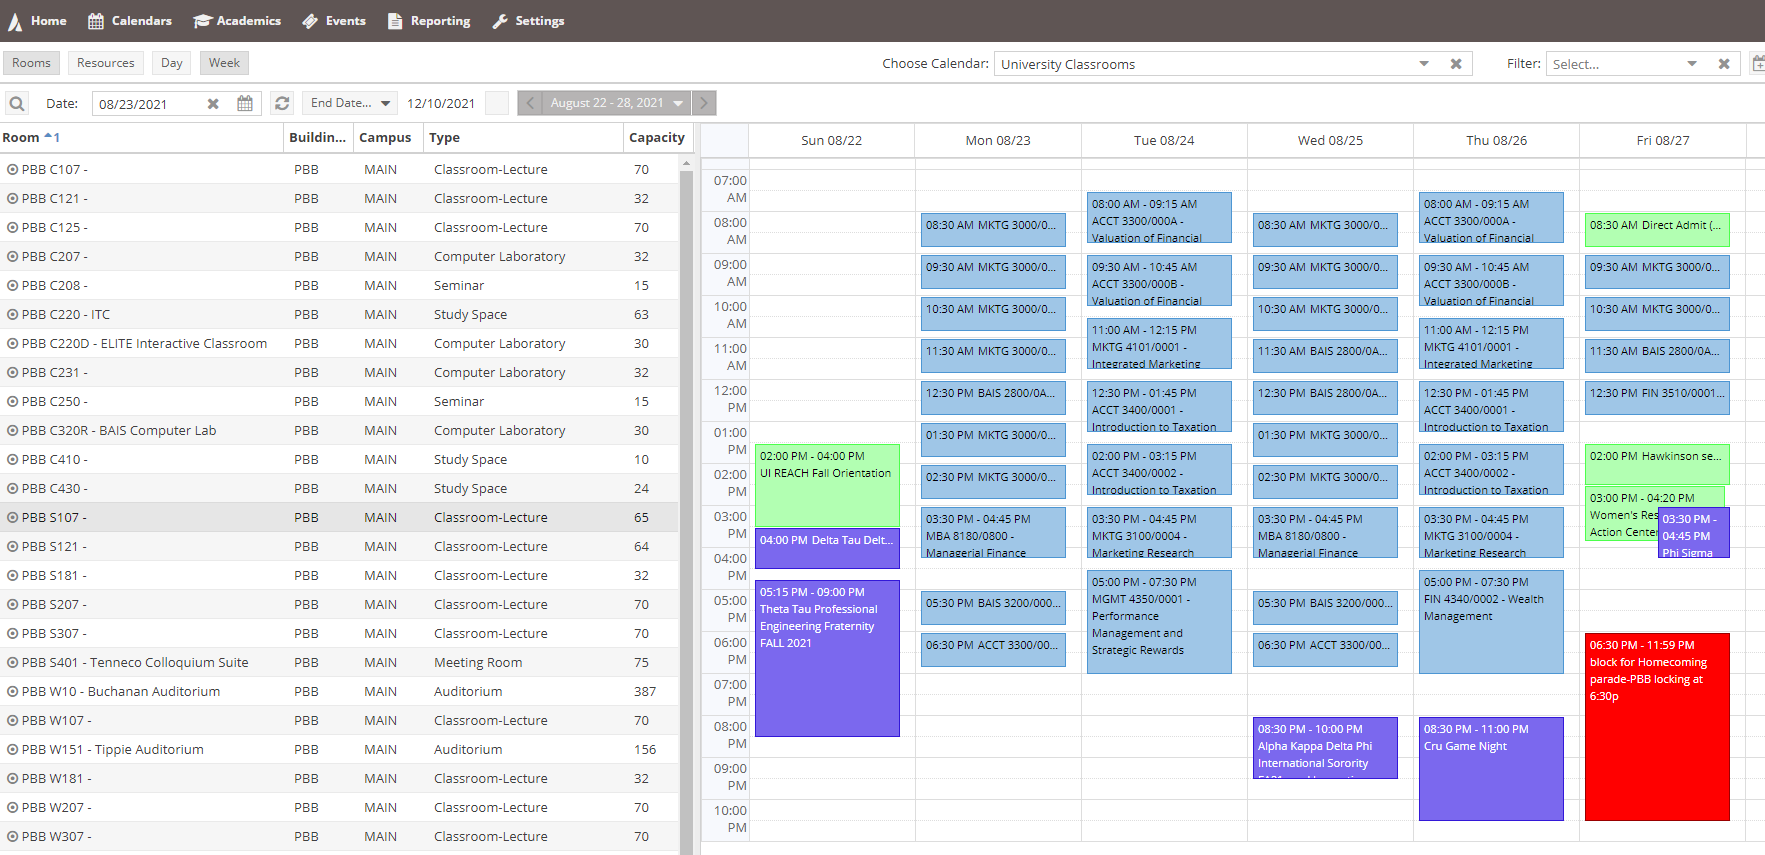
- Click on Calendar icon to select date and click the refresh button to display results of section and special event classroom assignments. An empty white and grey grid indicates room availability, or no events in place. Courses will be shown in blue or orange, exams are green, and student org meetings are purple. Red blocks indicate that a room cannot be reserved.
- To reserve a room, submit an event request via email or online request form to the appropriate scheduling office.
Quick start instructions with screen shots: Quick Start Instructions for Astra Schedule Viewer 8
Quick Start Instructions with Screen Shots
Quick start instructions with screen shots: Quick Start Instructions for Astra Schedule Viewer 8
Astra Training
The Astra Community is a place where Ad Astra users can give feedback, engage, share best practices, and learn from other Ad Astra scheduling software users. Users can search topics for training lessons and videos via the search icon on the top right corner.
Astra Training Videos
Ad Astra provides a variety of training videos to help you get started.
Astra Schedule Help: Events Overview
Training guides created by Ad Astra detailing how to create events from different screens.
Astra Event Names: FERPA Information
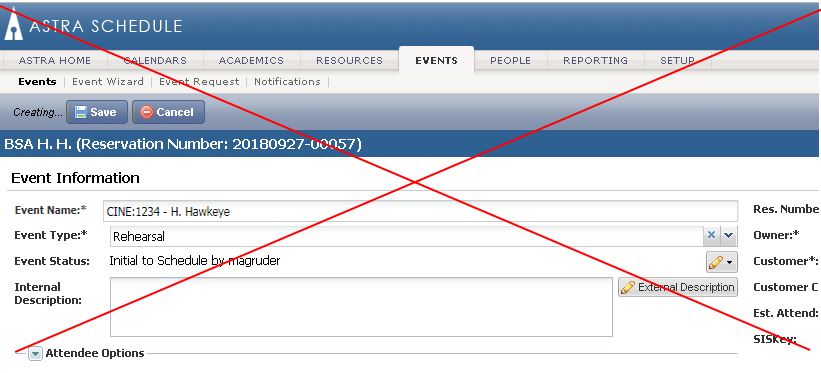
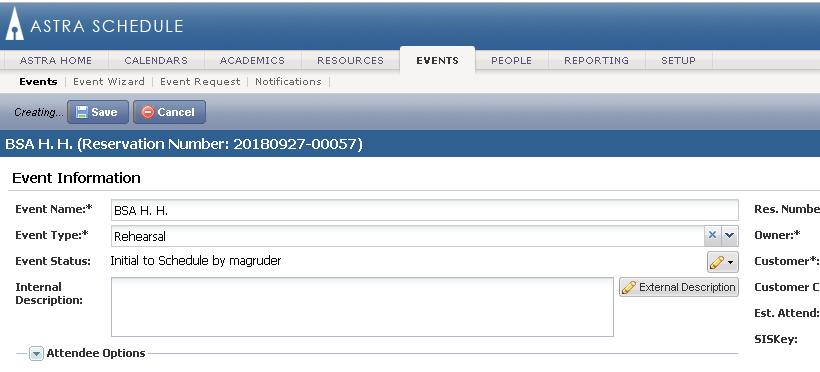
Each scheduler needs to be aware of the visibility of the information that will display ultimately on the Guest Role which is open to our entire campus with a HawkID and password. We must also consider any departmental website or digital display monitors where information will be fed. The Office of the Registrar recommends NOT associating a student name to any event name or title. Please add the student name in the Internal Description field in event creation on the event record OR abbreviate it in some way in the Event Name that DOES NOT include the course or section number. The Internal Description field is limited to view by FERPA approved staff members. However, the Internal Description field is not searchable. REMINDER: Class schedule is not Directory Information.
This Example does NOT follow FERPA Regulations:
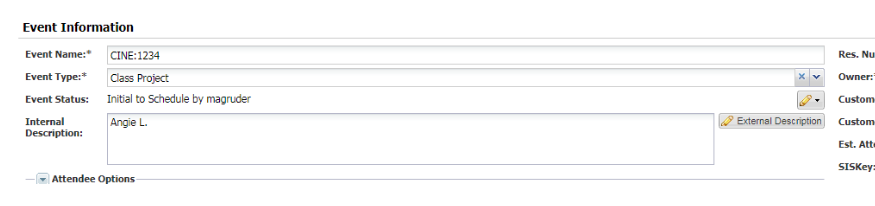
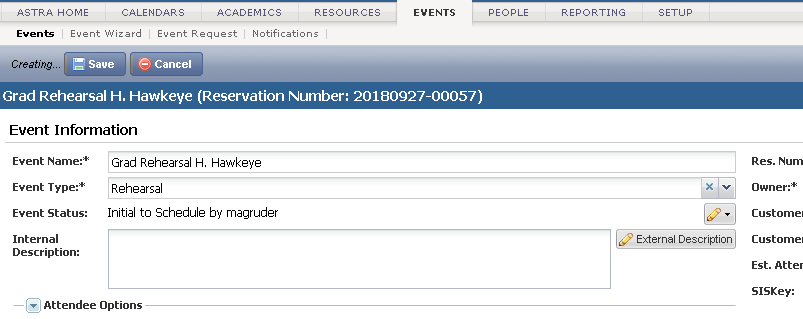
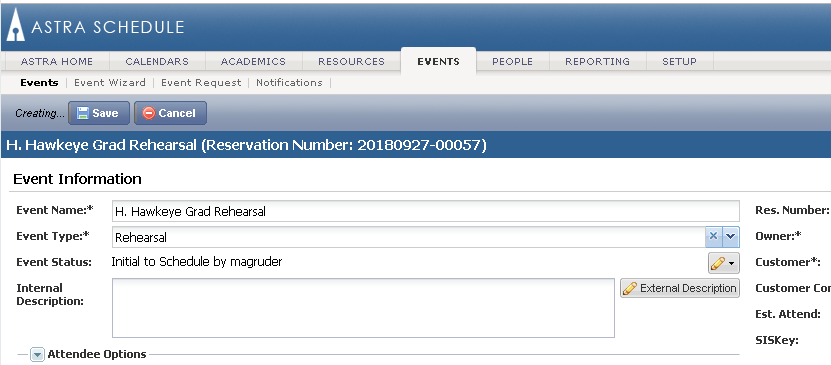
Please follow one of the suggestions below:
Astra Calendar Help
Training guide created by Ad Astra detailing how to navigate different calendar views.
Scheduling Multiple Meeting Records
The same event entry process can be used in either the Event Wizard, Quick Event on the Event Tab, or Calendar.
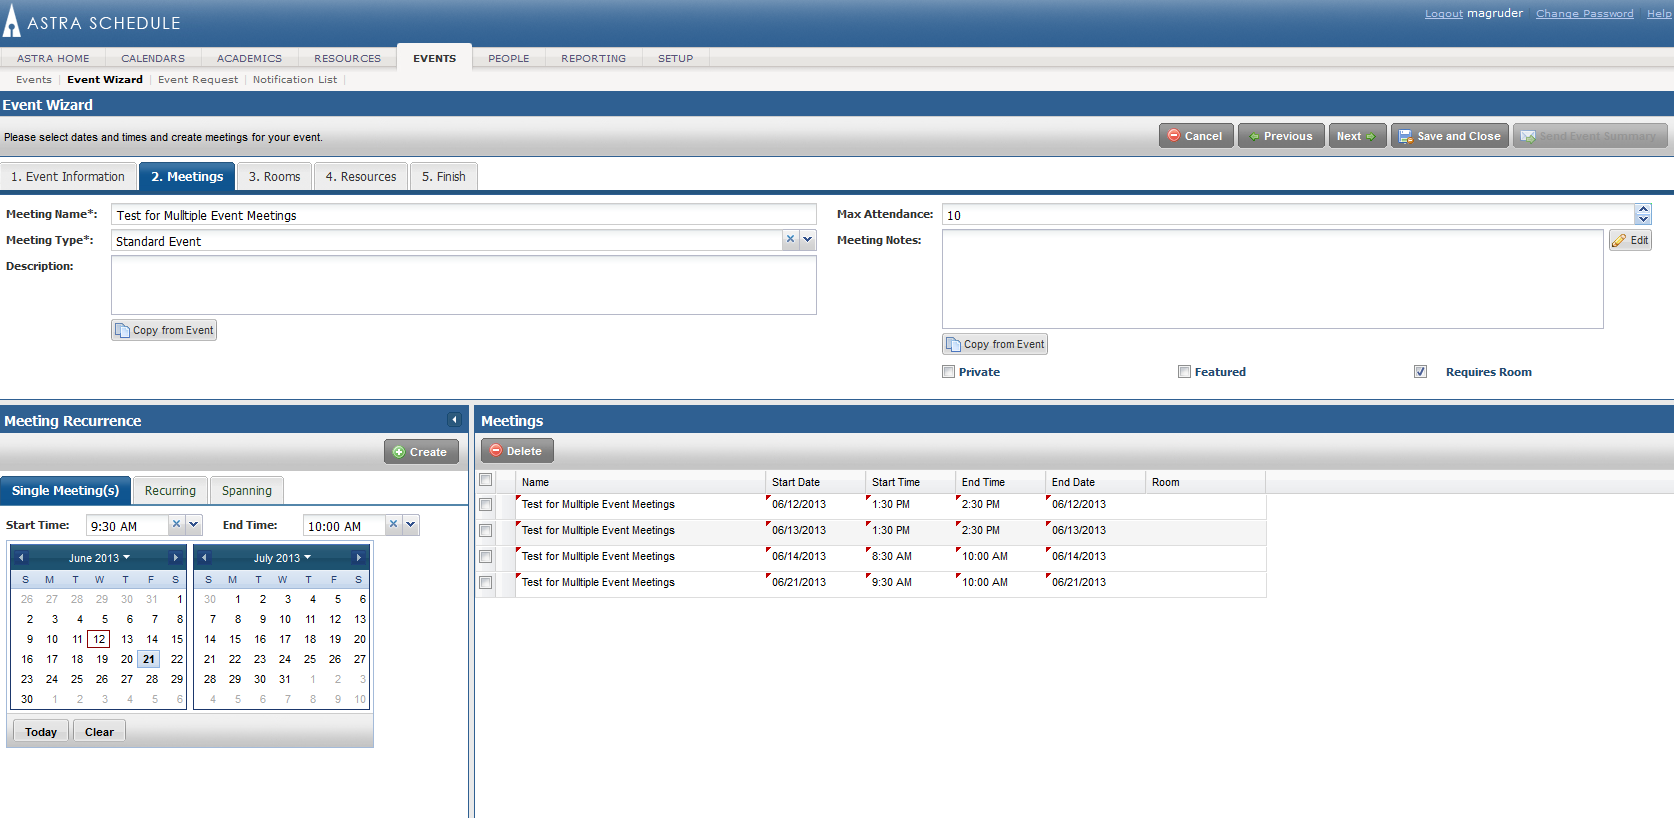
Event Creation with Multiple Meeting Records
Below is a screen shot of the multiple day, multiple time meetings setup set (CORRECT SETUP).
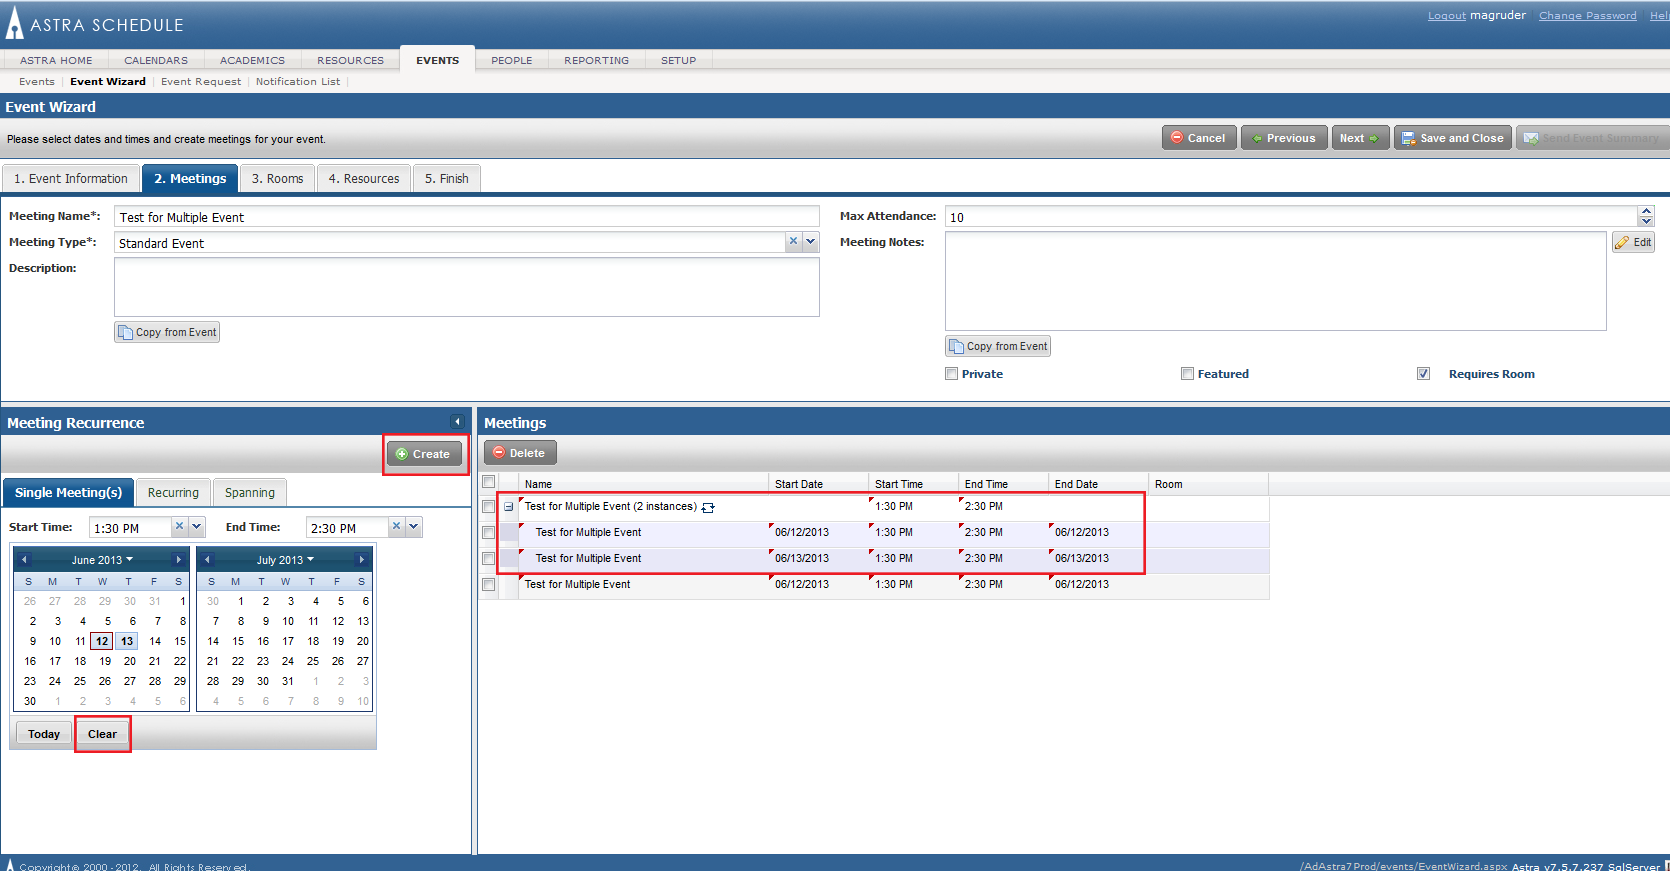
You will note a difference in the second screen shot below. Here you will see a grouped event at screen right (see where it shows 2 instances with a + sign under the Delete column). Astra assumed a group event was desired over a two day span and provided the opportunity to name each event with its own name/title. Look closely at the calendar, both dates are highlighted in a bluish grey color. This generally is not the desired approach. This will inadvertently occur if the dates are not cleared in between the event date creation.
The trick is to click the first desired date and time, click Create which then populates the event record to the right of the screen. You will then want to click CLEAR on the calendar, and proceed on to the next date and time and so on. You will see in this screen shot that step was missed and created a grouped event.
If this arises, you should cancel the event record and begin fresh - it is easy to leave event meetings in an Incomplete status which will cause further work to investigate and delete.
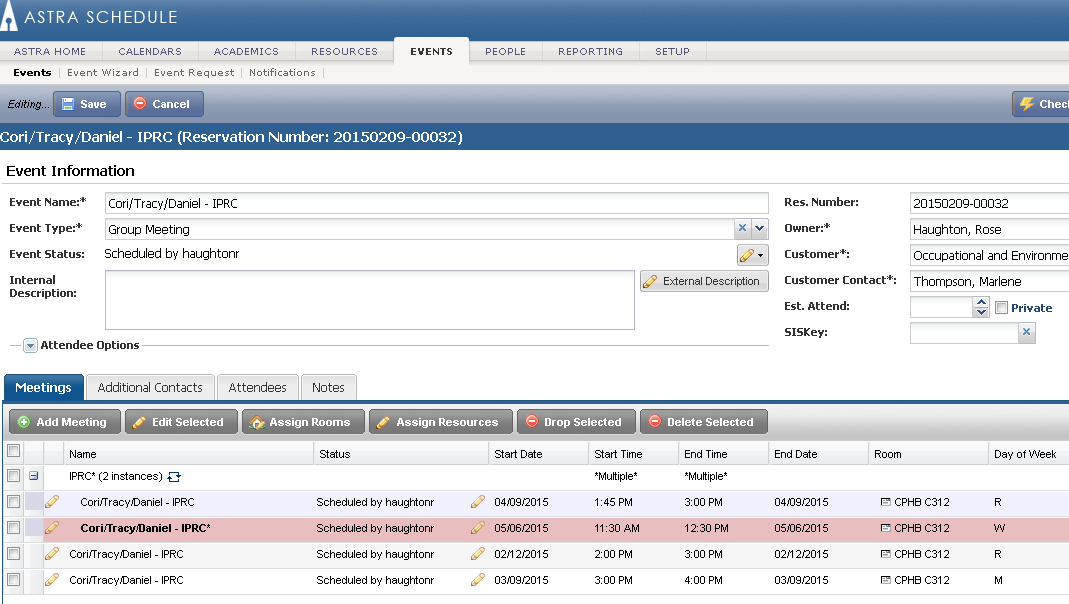
Edit Record Modification Color Coding
Astra has provided a color code on the Event record to indicate that a change to an event meeting date has occurred from the original event date creation.
In the below example, a scheduler created an initial meeting record on May 7 but later changed the record at the customer’s request to May 6. Astra is now providing an FYI notification of the modification to the scheduler.
How to Cancel Events
Cancel an Entire Scheduled Event with a Single Meeting Record
- Click on Events Tab
- Click on Events (first option)
- Filter to locate desired event to modify
- Click on pencil icon/Edit on the corresponding event record to open
- Place a check mark in the box in the Meetings box at screen right
- Click Drop Selected (Unassigned now appears in place of the building and room)
- Click on green Change button at top of screen
- Click arrow of pull down menu and select Cancel; next select Apply (Note: Meeting Status now reflects Scheduled to Canceled)
- Details of cancellation cancel be entered into Notes box, if desired
- Click Save at top of screen
Cancel an Entire Scheduled Event with Two or More Meeting Records
- Click on Events Tab
- Click on Events (first option)
- Filter to locate desired event to modify
- Click on pencil icon/Edit on the corresponding event record to open
- Place check marks in boxes of corresponding meeting dates to cancel in the Meetings box at screen right
- Click on Drop Selected (Unassigned now appears in place of the building and room)
- Click on green Change button at top of screen
- Click arrow of pull down menu and select Cancel; next select Apply (Note: Event Status now reflects Scheduled to Canceled & Meeting status in Room Assignment Box reflects Scheduled to Canceled)
- Details of cancellation cancel be entered into Notes box, if desired
- Click Save at top of screen
- Event record is now removed from Events List on Events Tab main screen
Cancel a Single Incomplete Meeting Record
- Click on Events Tab
- Click on Events (first option)
- Filter to query Event Meeting Status to Incomplete [and any other desired parameters] and click Search
- Click on pencil icon/Edit on the desired event record to open
- Click on green Change button at top of screen
- Click arrow of pull down menu and select Cancel; next select Apply (Note: Event Status now reflects Incomplete to Cancel & Meeting status in Room Assignment Box reflects Incomplete to Canceled)
- Click Save at top of screen
Cancel Incomplete Meeting Record with Scheduled Meeting Records to Remain
- Click on Events Tab
- Click on Events (first option)
- Filter to query Event Meeting Status to Incomplete [and any other desired parameters] and click Search
- Click on pencil icon/Edit on the corresponding event record returned
- In Room Assignment box, click on Event Meeting name in blue at far left of Incomplete/Unassigned record
- On Edit Event Edit Meeting record, click on green Change button at top of screen
- Click arrow of pull down menu and select Cancel; next select Apply
- Click Save
- Repeat previous three steps for multiple Incomplete/Unassigned events desired to be canceled
- Click Save at top of screen of Edit Event screen. All scheduled events should remain unaffected (Note: Event status remains scheduled and this removes the check boxes associated to the Incomplete record(s) if event is viewed again)
Sending Notifications to Outside Users
Astra Schedule resides behind a firewall and cannot generate an "external" or "non-uiowa.edu" email address. If an event confirmation/verification needs to go to an off-campus user, the scheduler will need to send the event confirmation to themselves and then forward it on from their personal email inbox.
Ad Astra Reference Materials
Astra 8 Overview Topics

Evolution of Event Scheduling
An overview of user interface changes from Astra 7 to 8.

Astra Alternate Event Time
How to find an alternate time for an event in Astra 8.

Creating Astra Events
How to create events to include event meeting types in Astra 8.

Astra Meeting Details
Managing meeting details in Astra 8 event scheduling.
Tips and Tricks
Cache Reminder for Improved Performance
It is recommended by Astra Schedule to clear your browser cache for all time from time to time. Astra Schedule uses a significant about of cache for the user profile and improved performance will be found if this becomes part of a user’s routine. This article will assist for additional support at https://its.uiowa.edu/support/article/719.
If any of these statements mentioned below are something you’re experiences, you are most likely running into an issue with your browser cache.
Common Cache Display Issues
“I am seeing a gray screen and it does not allow me to click on anything”
“The wrong event is listed in the ‘Event Information’ section”
“When I click to approve the event the system doesn’t move forward”
“I can schedule events, but if I try to edit or cancel them, the screen freezes and I can’t move forward”
“Any event I try to edit has the same title”
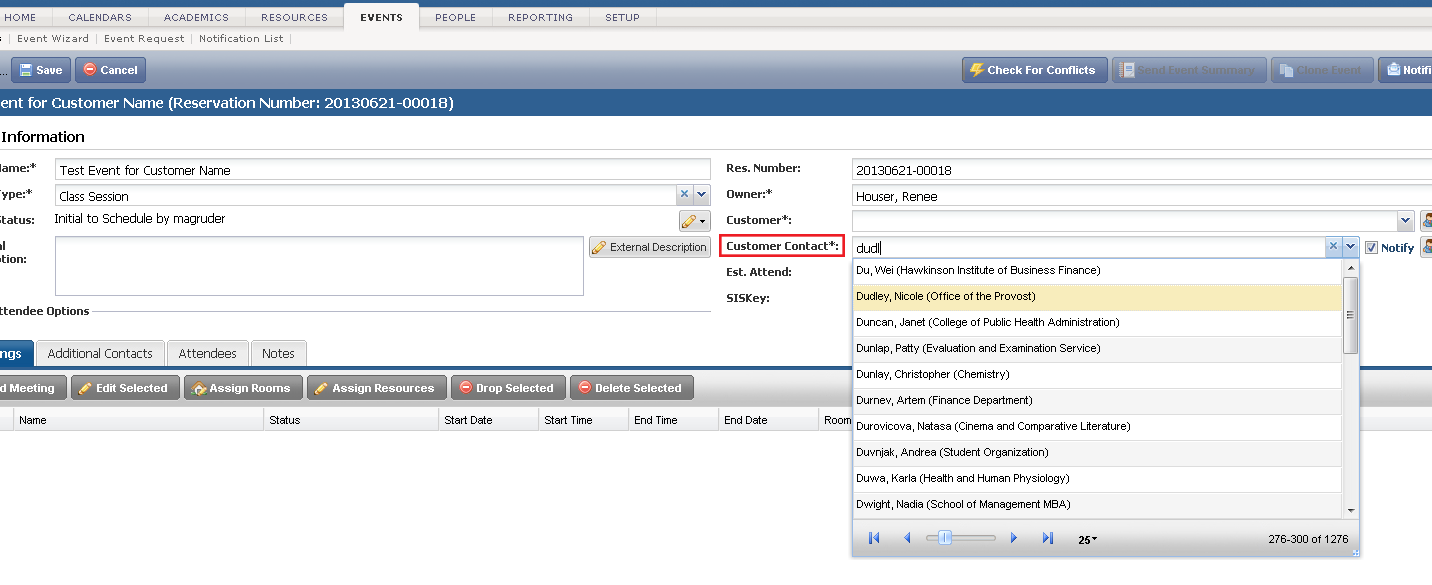
Customer Name Shortcut
If you know a person’s last name but do not know with which Customer (or Department) the person is associated, you can fill in the person’s last name with the drop-down arrow and Astra will fill in the appropriate associated customer name. (Just be sure Astra does not auto-populate the first name entry back into the name field.) This shortcut prevents the scheduler from having to cancel/save the event to investigate the information.
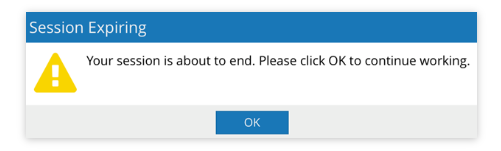
Astra Schedule Session Timeout
When a user has been inactive in Astra Schedule for 60 minutes, a modal will appear to ask the user to click OK to extend their session. If the user clicks OK to extend their session, the session timer will reset, and they will be able to continue to work as normal.
If the user does not click OK, they will be signed out of Astra schedule, then redirected to the sign-in page, and any unsaved work will not be saved. The sign-in prompt will display a message indicating that the user’s session has expired. When a user signs back in they will be redirected back to the page their session had expired on.
When a user has multiple tabs open in Astra Schedule, the session time out modal will appear on each tab instance. Clicking OK will continue the session and close the session time out modal for all tabs. If the user does not click OK, the session will expire and redirect, all open tabs.
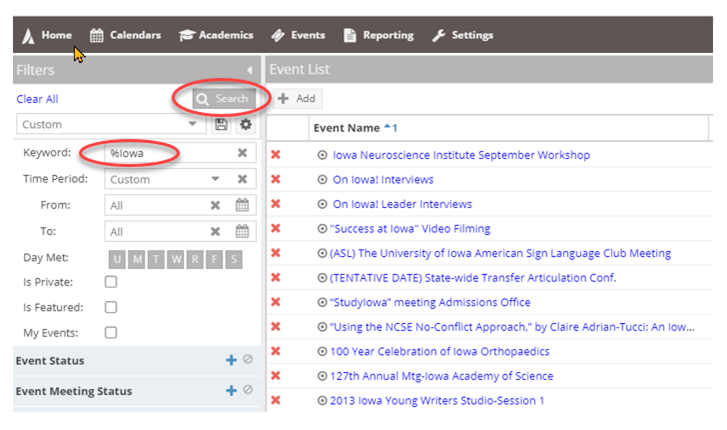
Searching for Events by Name - Wildcard Search Feature - %
Navigate to the event tab and select Events. In the filter section on the left side, fill in the relevant fields to locate the event. Avoid being overly specific in the "keyword" field, as Ad Astra is sensitive and matches the exact text entered with the event name. To search using part of the event name, use the % symbol as a wildcard. For instance, if the event is "Faculty Professional Development", try searching for "%Professional%".
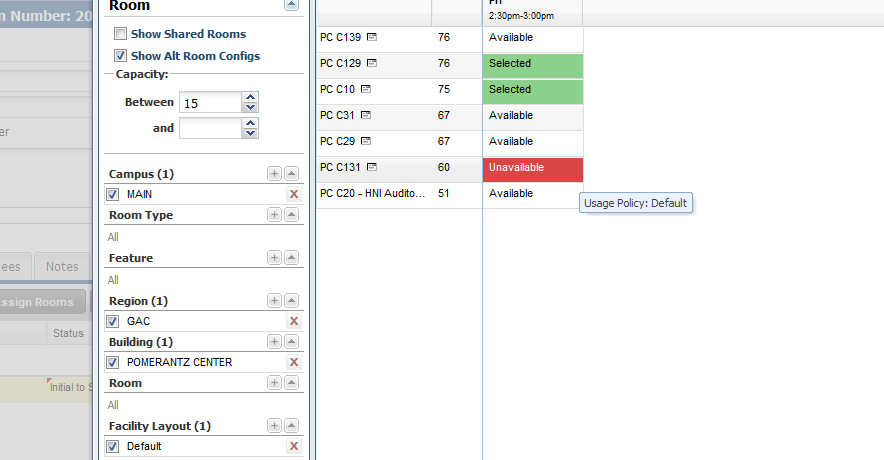
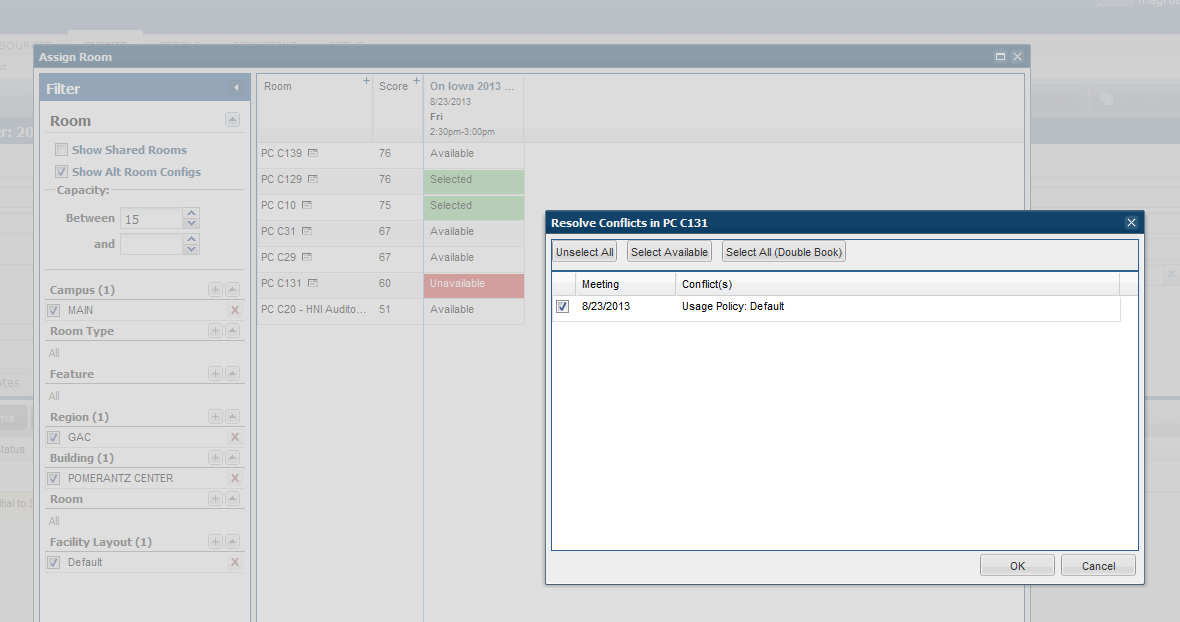
Scheduling in Shared Classroom
The below screen shots indicate what Astra displays in shared scheduling agreement. If you hover over the Unavailable cell you will see why the room is unavailable. In this case, C131 PC is shared with AVC as indicated by Usage Policy: Default. Just click the red cell, accept the double book and click OK to continue through the event reservation process.
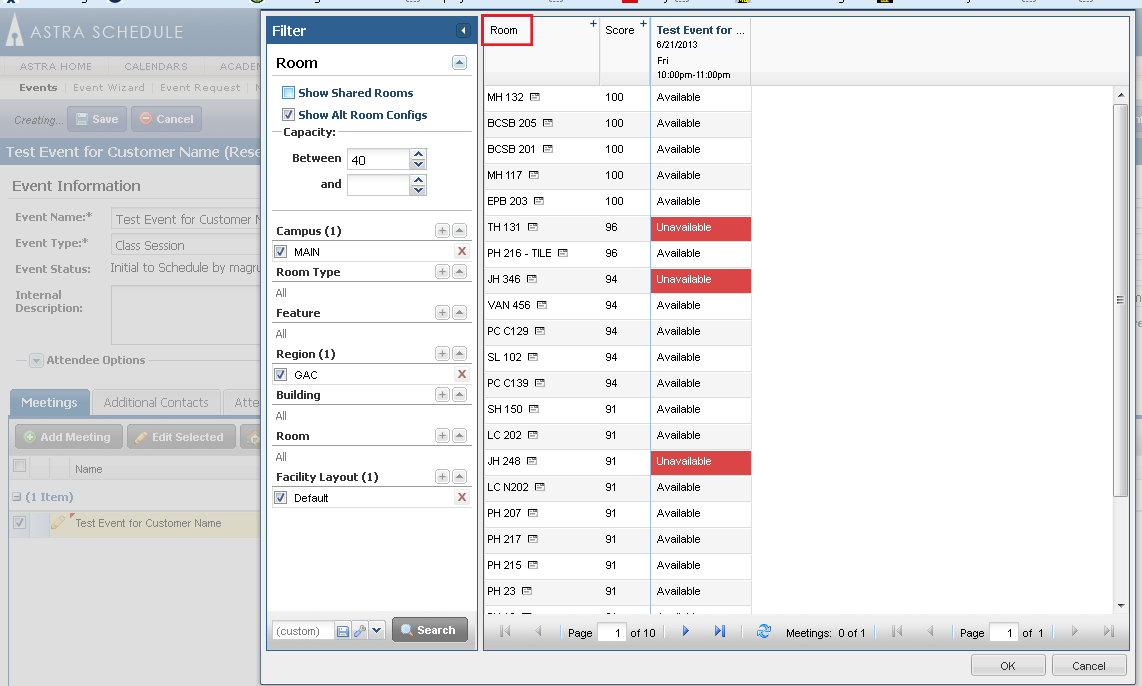
Alpha Sort by Building/Room on Available Room Options In Event Creation Process
Click anywhere in the square labeled Room for a quick alpha sort instead of the default room score sort.
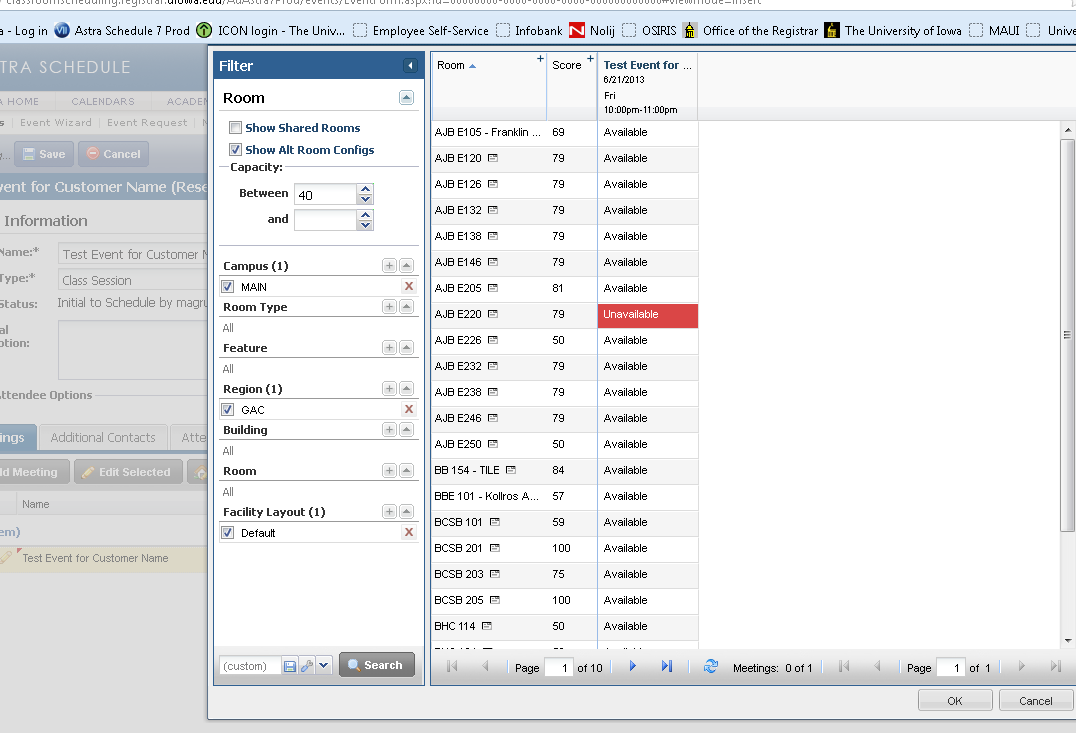
Here is the result after clicking the Room column, alpha order by building and room.
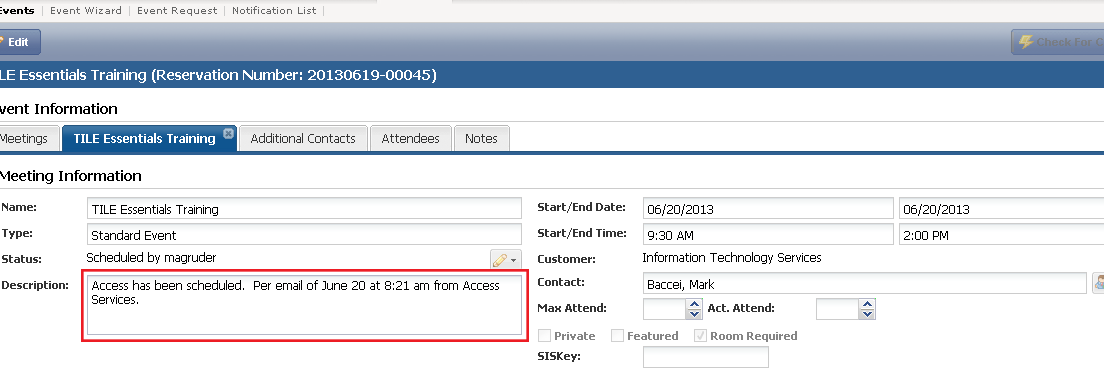
Classroom Scheduling Access Notes and Special Important Details
For consistency, please place any notes for FM Access in the internal Description text box.
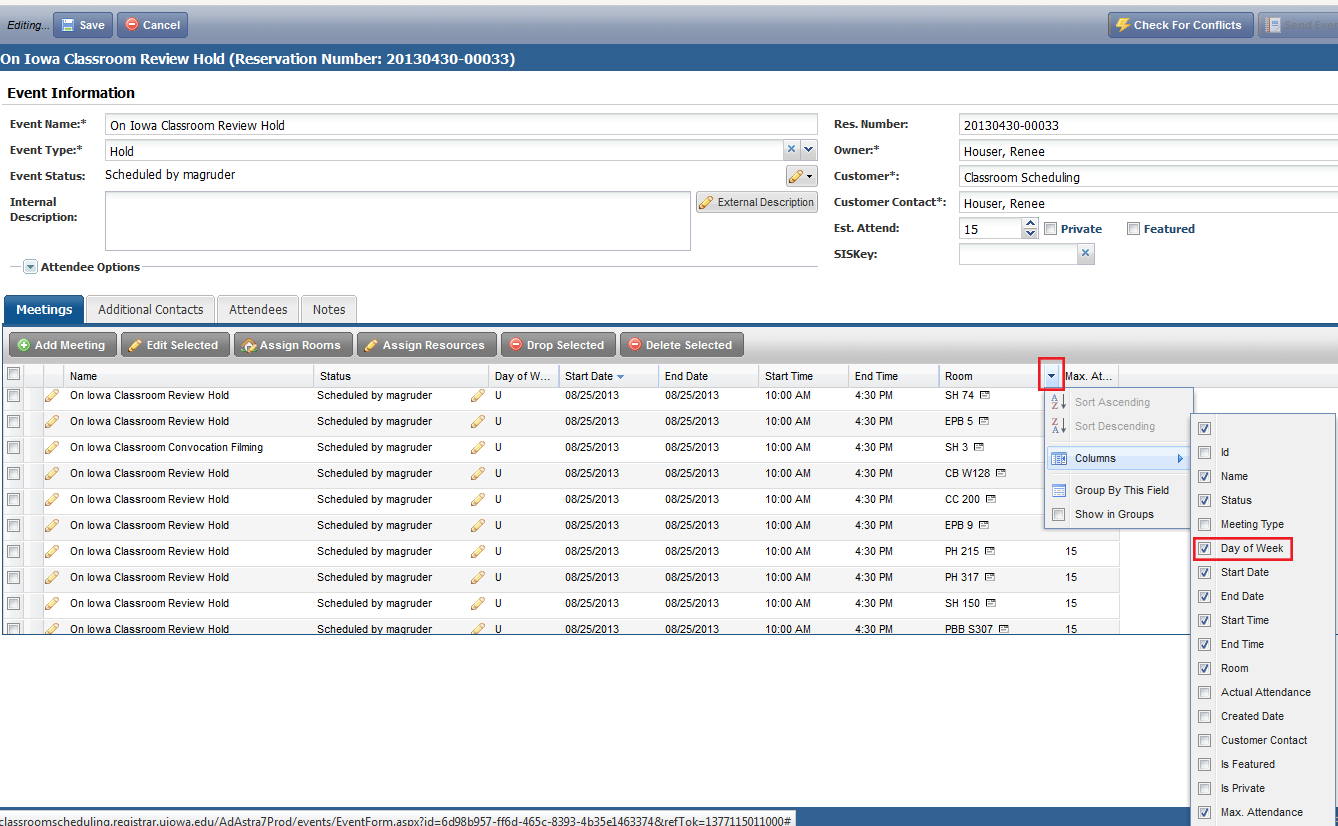
Add Day of Week to the Event Edit Screen in Astra 7
Use your pull down menu in the Event Edit Screen on one of the field headers shown below to find the Day of Week checkbox. Once it displays, you will be able to slide the column to your preferred location on your screen.
Check for Conflicts Button
The Check for Conflicts button is a tool that can be selected IF you want to predetermine if your event will conflict with a section/event/resource prior to saving. If you don’t select this button upon saving, Astra will alert you if a conflict exists within the event.

Generating Confirmations
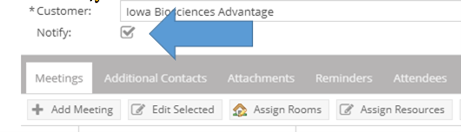
Event email confirmations are not generated by default in Ad Astra and must be manually generated from the Event Details page. To do so, first select the Notify button for event confirmations to generate to the customer and any other selected individuals.
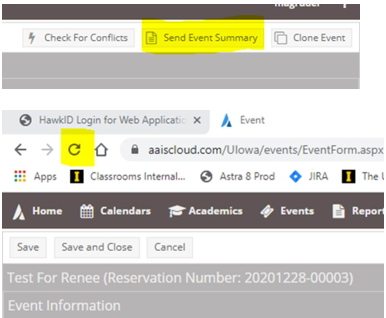
To send a confirmation, users must choose "Send Event Summary" in the top right corner. The Send an Event Summary box should pop up. If this box does not appear, a refresh of the browser may be necessary. Be sure to first save your event.
When the Send an Event Summary box pops up, be sure that the default is checked to "true" (not false) under the notify recipients box.
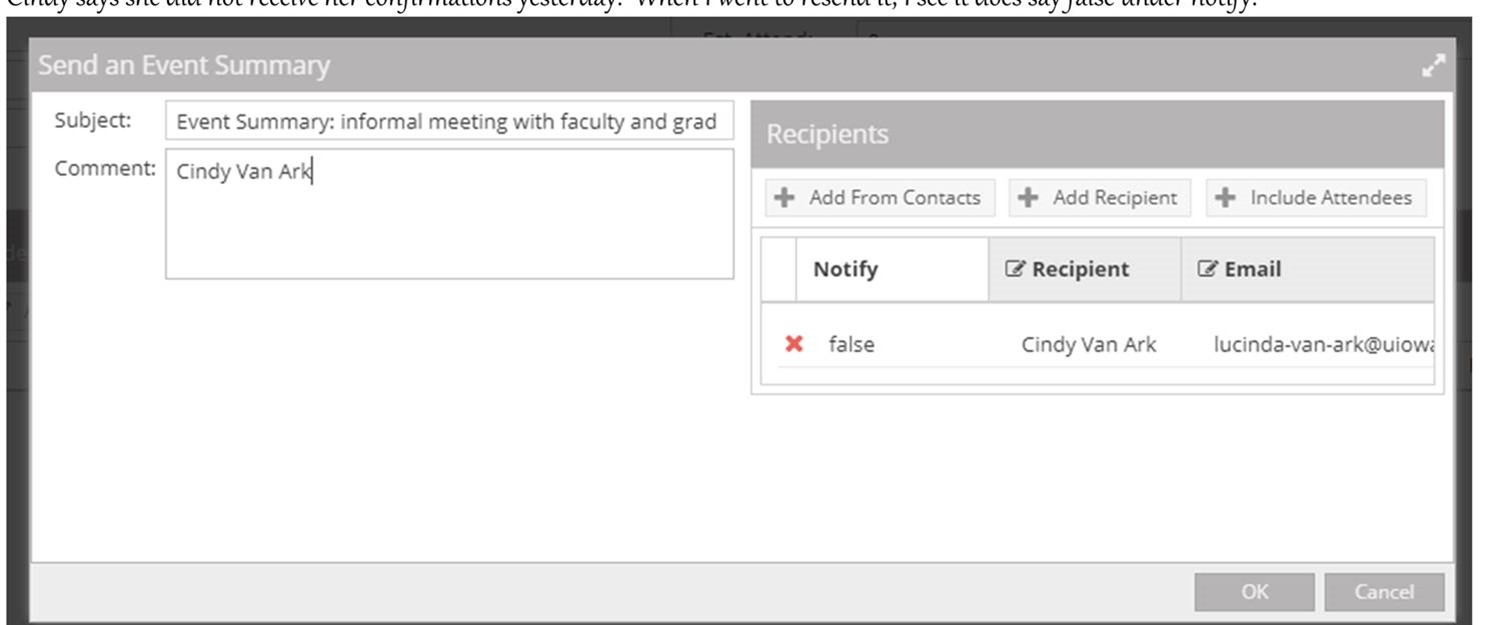
Add any relevant information in the comments field and hit OK. An email with the Event Summary attachment will be sent to the individuals selected.
Best Results with Chrome Browser
Astra’s display of Calendar information, both academic and events, is best suited to the Chrome browser.
Apple vs Mac Computers
Astra Schedule has the same functionality on Macs as it does for Windows. We still recommend using Google Chrome for your web browser for best performance.
Display a Single Room's Schedule for the Semester
By leveraging the end date feature in the Weekly Scheduling Grid, you can navigate an entire semester long single room's schedule efficiently. To do so, select Calendars: Scheduling Grids and choose the week view. Select the room and enter start and end dates.
View all activities—courses and events—in a single room across the entire week by selecting the start and end dates of the semester or a set of dates. This tool allows you to visualize all room activity, easily identify late-starting courses and hover over events or classes to view potential conflict dates.
Recurring Event Dates
When creating a recurring event, Ad Astra is set to default to 10 occurrences.
The radio button MUST be set to the End by date field or the 10 occurrences will override your desired ending date. Simply adjusting the date will NOT bring the radio button down to the End by field.

Display Classroom Name Column in Scheduling Grid
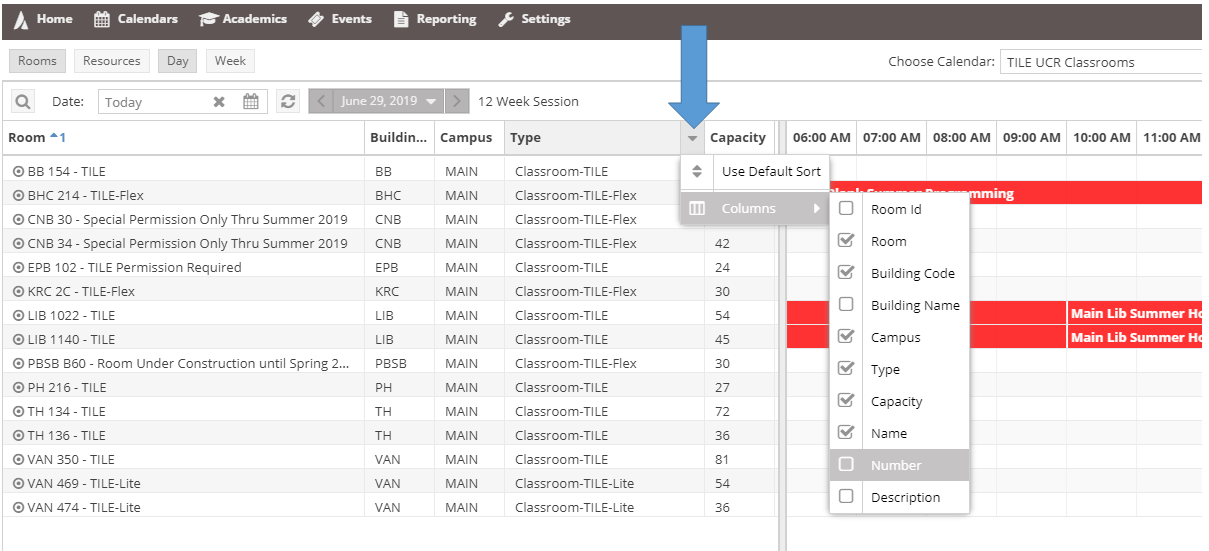
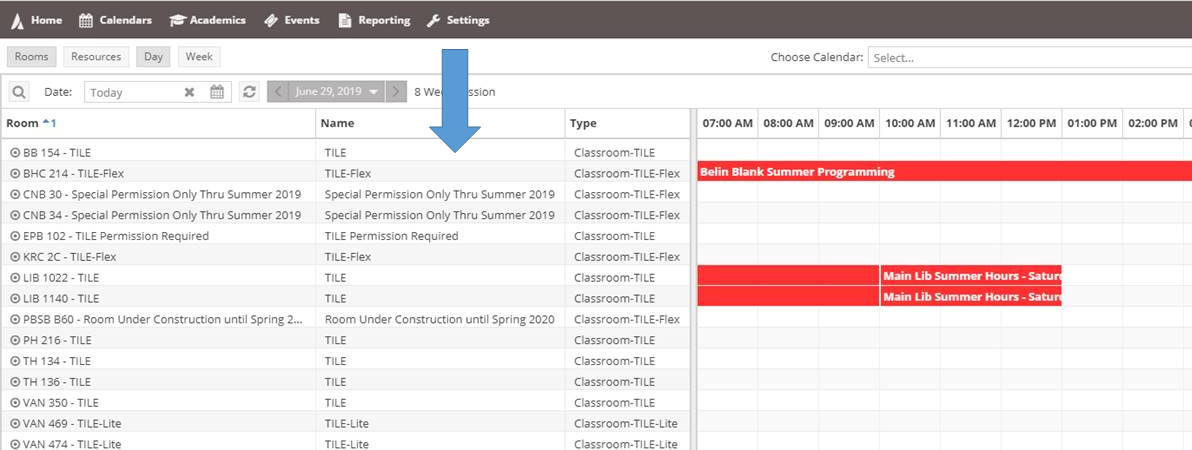
The Classroom Name column is not automatically displayed in the Scheduling Grid. This field is used to describe room usage, names of auditoria or special scheduling information. Use of the Column Heading options can add this column to the Scheduling Grid view.
See the screen shot below. Use the arrow to display the options from the listing and check Name. Once your screen refreshes the helpful field will once again return. Please note, after you clear your browser cache, it may be necessary to recheck the box.
Refresh Uiowa Astra Permissions
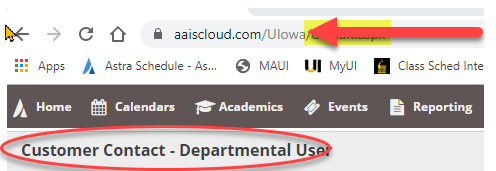
A permissioned Astra user should arrive either at the Customer Contact – Departmental User or Institutional Contact permission levels upon login. If not, please adjust your URL by removing/deleting all characters and letters after the “a” in UIowa and hit Enter. This will force a reload to Single Sign On for permissions check.
https://www.aaiscloud.com/UIowa
Astra Scheduling Calendar Color Code Key
Astra Scheduling Calendar Key
Section and meeting details can be found by hovering over the colored boxes indicating class sections or special events while in guest view. Details such as days met, start and end date, enrollment, room building, instructor, event meeting name and type to name just a few.
| Red | Classroom or facility blocked from use |
| Orange | Co-existing course sections |
| Yellow | Announcements (Week View) or Campus Wide Event Space (Unconfirmed block) |
| Dark blue | Scheduled events for university departments and/or organizations – course related |
| Green | Scheduled events for university departments and/or organizations – non course related |
| Dark green | Exams |
| Light blue | Course sections |
| Sky blue | Split-classroom partition conflict (select rooms only) |
| Dark grey | Split-classroom partition conflict (select rooms only) |
| Bright blue | Custodial Servicing |
| Purple | Student organization event |
| Light pink | Performance |
| Pink | Concert |